
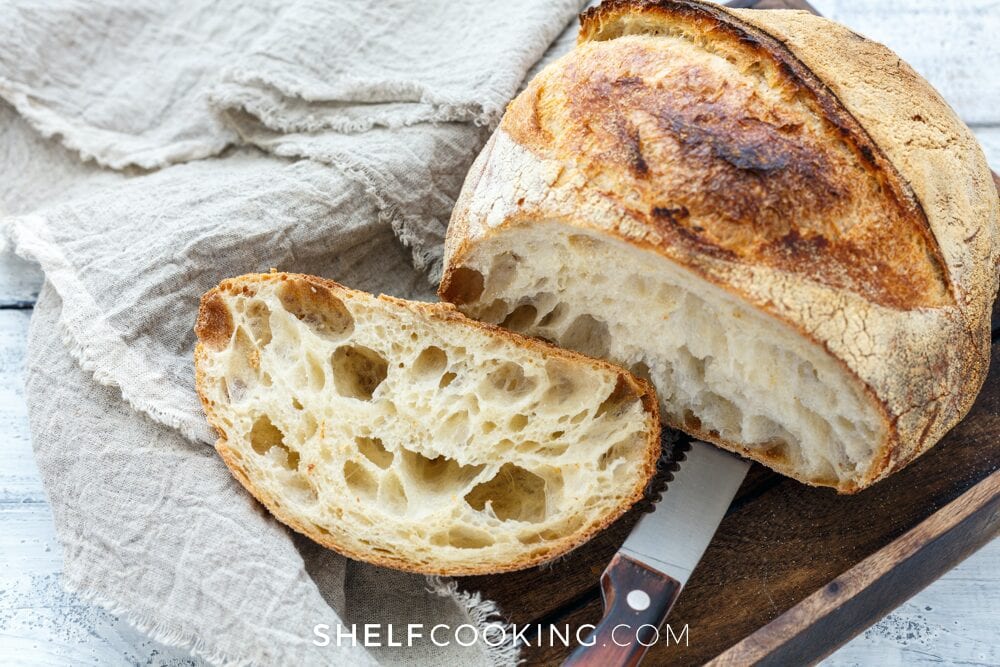
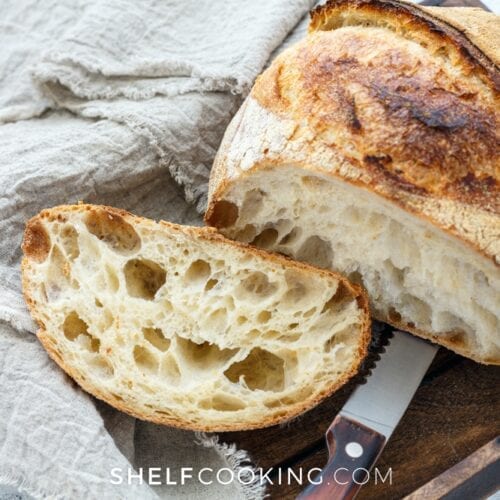
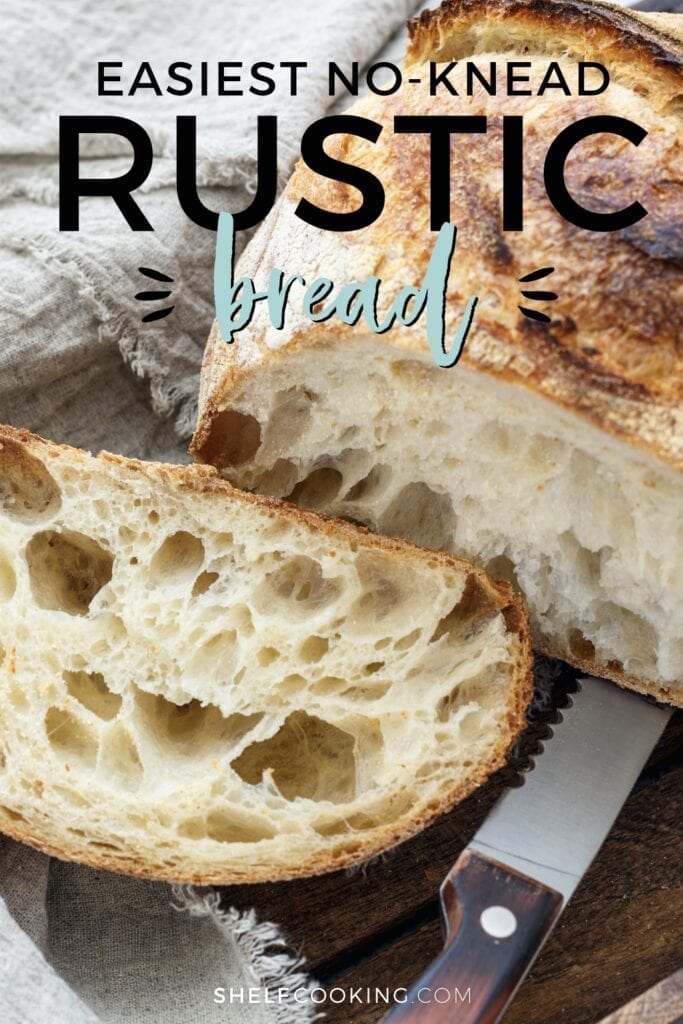
No knead, no loaf pan, no Dutch oven, no problem! Our rustic bread recipe is so simple, using only 5 ingredients that you likely have stashed in your cupboards. In just a few hours, you'll have the most delicious bread that has an amazingly crispy crust and is pillow-soft inside!
There's nothing better than homemade bread, fresh out of the oven. It's perfect for breakfast, lunch, dinner, snack time, or any other time! But one of our favorite things about it? It's one of the best ways to stretch a meal and fill hungry bellies!
Don't forget, I have an entire digital recipe ebook with all of my favorite bread recipes! Grab your copy of Our Favorite Bread Recipes Ebook here!
*Note: When you click the links in this post, we may receive a commission at no extra cost to you.
WHAT IS RUSTIC BREAD?
Rustic bread is defined by its simple ingredients and irregular shape. Since it doesn't require a loaf pan or a well-fed sourdough starter, even non-bakers can make delicious bread every time! We love that you don't need any fancy gadgets for it, although a stand mixer does make it easier.
With a perfectly crispy crust and a soft center, rustic bread goes well with anything.
TIPS FOR MAKING THE EASIEST CRUSTY RUSTIC BREAD
We could make this every week and never get tired of it. Shoot, we could make it every day and never get tired of it! You won't be disappointed, we promise. Plus, it's a great shelf-cooking recipe because all of these ingredients are kitchen staples!
Here are some tips for preventing a heavy, or overly doughy, loaf:
- Weigh out your flour using a food scale. This will keep you from using too much or too little. If you don't have a food scale, fluff the flour and use a spoon to add flour to the measuring cup versus scooping it out in the measuring cup.
- Start by using two cups of water and slowly add in the third until your batter is the correct consistency.
- Dough should be slightly sticky to the touch, but not so that much comes off on your hands. If it’s too sticky to handle, add ¼ cup more flour at a time.
- You can bake your bread in a Dutch oven if needed. It should take about 50 minutes to an hour to bake completely.
- You can also bake your bread in loaf pans, but the outside won’t get crispy. The normal cooking time should be enough.
- If your crust is getting too brown, you can tent foil over it so the outside won’t keep cooking.
- Use a thermometer to check the inside. It should read at least 190°F before you take it out of the oven.
- Tap the bottom of the loaf to check for doneness. If it sounds hollow, it's perfect.
- If the bread is hard, lower the oven temperature by 25°F and cook for 5-10 minutes longer.
- Don't cut the bread for at least an hour, as the crust is still forming. This will keep it from deflating!
We've made this so. many. times. and it has turned out so delicious every time.
STORING RUSTIC BREAD
If you manage to have any bread left over (and that's a big if!), store the sliced bread in an airtight bread bag or zipper bag at room temperature. Store full loaves in a brown paper bag to keep the crust from going soft. Place half loaves open side face-down on a cutting board.
Rustic bread usually only lasts for a few days before it starts going stale. At that point, you can repurpose it for something else, if that's your thang. (Those ideas are comin' atcha below!)
Rustic bread also freezes really well! Wrap your whole loaf in plastic wrap and aluminum foil to help prevent freezer burn. When you're ready to thaw, just leave it wrapped up on the counter for a few hours and it'll be good as new. You can also freeze slices of bread, so don't be afraid to throw those in a freezer baggie if you have any leftover as well! They're handy when you need a slice or two of bread versus the whole loaf.
WAYS TO USE YOUR NEW FAVORITE CRUSTY BREAD
Here are our favorite ways to eat this rustic bread, both fresh and when it's starting to go stale. Don't even think about wasting it because it's too delicious for that!
- Alongside Soup – You can never ever ever go wrong with soup and bread!
- With Pasta – The same goes for pasta dishes! The bread tastes so good sopping that sauce up.
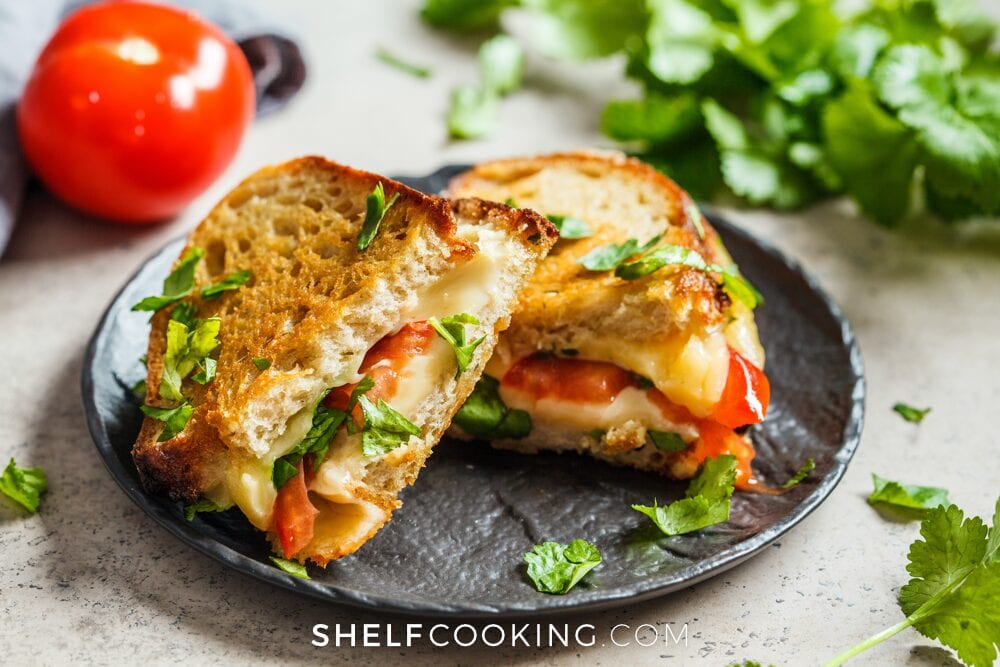
- Fancy Grilled Cheese – Take your grilled cheese to the next level with this delicious bread versus plain ‘ol white bread.
- Cheesy Garlic Bread – Talk about elevating a recipe! Rustic bread is the perfect way to make this delicious snack/meal/appetizer/just because.
- French Toast – Don't sweat it if your bread is starting to go stale! Our French toast recipe is the perfect way to revive it.
- Cinnamon Toast – Bread + butter + cinnamon sugar topping = Heaven. Seriously, all it takes is popping it in the oven for 5-10 minutes until everything gets warm and gooey and you'll be on your way to paradise!
- Make into Croutons – Cut stale bread into uniform chunks and toss with olive oil or butter and seasonings (garlic powder is a must!). Bake in the oven at 375°F for about 15 minutes or until golden brown, stirring once.
- Turn into Bread Crumbs – It's so easy to make your own bread crumbs!
Pro Tip: Plan your meals around when you're making your bread. This will help you use it up before it goes stale! You'll know when to make it fresh to accompany your favorite meals, then turn it into something else before it goes bad.
HOW TO MAKE RUSTIC BREAD
Alright, it's the moment you've been waiting for! This is my most viral recipe, and it hasn't failed me yet, so go ahead and save this in a safe spot.
Rustic Bread Recipe
Ingredients
- 3 cups warm water
- 2 ¼ tsp (1 pkg) active dry yeast
- 1 Tbsp sugar
- 6 cups (750 g) flour
- 3 tsp salt
Instructions
- Mix water (see notes), yeast, and sugar in a large mixing bowl or stand mixer. Let sit for about 10 minutes until bubbly.
- Add flour and salt. Mix until combined into a soft dough. (The dough should be slightly sticky to the touch, but not so that much comes off on your hands. If it’s too sticky to handle, add ¼ cup flour at a time.)
- Cover loosely with plastic wrap and kitchen towel. Let rise for 1-3 hours, if possible! I’ve run out of time before and let it rise for only 30-60 mins and it still works, but the longer, the better!
- Preheat oven to 450°F and put a pizza stone or flipped-over cookie sheet in the oven to heat up.
- Fill a baking dish with 2 inches of water and place on the bottom rack to create steam for an extra crispy crust.
- Sprinkle flour on the counter, turn out the dough, fold on itself, divide in half and form it into 2 balls. Don’t knead or handle it more than you need to. Add a little flour if it’s too sticky.
- Cut an X shape on the top of the balls with a sharp knife.
- Place on a lightly floured pan, then place on top of the hot pizza stone or cookie sheet.
- Bake for about 25-30 minutes or until golden brown and cooked through.
Notes
Sounds good, right? It's such an easy recipe, and the bread comes out perfect every time!
Well, there you have it! Give it a try and let us know how you like it! And don't be surprised if your friends and family start begging you for the recipe or a fresh-baked loaf.
Looking for more shelf cooking inspiration?
- We can't get enough of these mini German pancakes!
- Tired of the same old baked chicken every week? Try out these different recipes to help keep things fresh!
- Love your leftovers by repurposing them into something new!
Happy baking!
Amazing! So easy, smells so good and so cheap!! I loved it.
Super easy recipe, made it for the second time today. Added 4 tablespoons of fresh Rosemary, a tin of black olives (sliced) and sprinkled some coarse salt on top. Perfect dipped in olive oil and balsamic vinegar with herbs. Thanks for the recipe!
That sounds DELICIOUS!!!
Doing this today for the third time. First two tries came out PERFECT! Today I will attempt to bake a single loaf in a 5 quart cast iron Dutch oven. I generally use it for Sourdough bread but today I feel adventurous. Also added Thyme and mint flakes to the dough and I will top with Pink Mediterranean coarse salt then bake it.
How do we cook it in the Dutch oven? Temperatures, instructions, etc. Thank you.
How do we cook it in the Dutch oven? Temperatures, instructions, etc. Thank you.
Interesting, I have updated the link and confirmed that it does work now for the bread ebook! Thank you for letting me know!
I cooked the whole recipie in my 7qt Dutch oven . Used parchment paper and flour to help it not stick . Upped temp to 500- and did 45 min . I took it out a bit too early – it could have done another 5 min I think ! It’s yummy – crispy outside and a little more dense than picture inside .
Awful recipe. Followed to a t. Dense disgusting bread. On to the next “best bread “ recipe.
I need to ask….I weighed my flour, even the water, and this came out SOOOO gloopy! Not just sticky, but I could actually pour this. Is 3 c of water right?? It seems like a very high hydration. I ended up adding another whole cup, and it did not change. Now I’m wondering how this will bake. I saw a comment about pancakes, and to be truthful, my budget can’t afford throwing ingredients away. What did I do wrong? I even resorted to my stand mixer because I couldn’t mix it in by hand anymore.
Start your yeast is just 2 cups of water, then add the flour and add the 3rd cup of water as needed. I had the same problem because the recipe states that you should use 3 cups in the recipe but the notes say start with 2 cups. It turns out perfect if you use 2 cups for the yeast mixture and then just add in a little bit of the 3rd cup if its too dry.
You are absolutely correct. You didn’t do anything wrong. As written (750g flour and 710g water) this bread dough has a hydration of 94.7%. That is going to be an extremely wet dough similar to a pan de crystal. It will require advanced dough handling skills to manage. Most home cooks are more comfortable working with dough that has 75% hydration. For this amount of water you will need 950g of flour to achieve 75% hydration.
This exact thing just happened to me tonight. Mine wouldn’t cook all way and it was just not good.
This was also the case for me, but stick with the recipe and flour it a bit. if it’s still sticky, coat your hands with oil, and knead accordingly.
Hey there!
I’m a bread making newbie, I’ve got some high grade flour to use up, just wondering would I still put in the 6 cups as recipe states? Or should I just judge by stickiness?
Thanks
Amazing 😉 I need try it
Havent tried yet, but super excited! Just a quick question, how (if possible) could I sub out the dry yeast for sourdough starter? How much water/flour would need to be adjusted? Thanks a ton!!
We haven’t tried that, so we don’t really have any advice on how to sub that out. If you give it a try, let us know how it goes!
I just made this. I don’t know if it’s because it’s very humid where I live right now but the dough was super sticky! I weighed it out and still ended up adding a cup extra of flour. After the rise it was so sticky it just ended up like two pancakes…. I still baked them and my hubby and kids said it tastes great but they look like UFO saucers! Hahahha
You’ll want to research to make sure, but I’m pretty sure you can substitute 3/4-1 c sourdough start for 1 TBS yeast in any recipe.
Oh, and you’ll need to add quite a bit if rise time for any sourdough start. Like 12-24 hour.
Side note: this recipe is almost identical to my sourdough bread recipe (except this one has sugar). So from that one to this, the 3/4-1 C ratio is right on.
Wow this was absolutely delicious and very easy to make, I used all purpose flour and you’re right the longer you allow to rise the better the bread is, took a third of the dough and made cinnamon rolls. This recipe was one of the easiest and best recipes I have made in a while. Thank you
What stage did you add the back olives?
Made this for the first time last night, it’s the first bread I’ve ever tried so I’m a total newbie. It turned out super dense, I’m wondering if I added too much flour in an effort to make it less sticky?
Also I keep checking the temp when it came out of the oven and once it was 200F I took it out thinking it was done but it’s pretty sticky doughy inside…what should I change next time? Did I handle it too much or something? Should I have kept cooking it? It’s so heavy and dense!
Amazing. Super super easy, didn’t even have to get my hands dirty! Smells amazing and has great flavor. Would be good as a rosemary loaf too. I didn’t see the note about using a spoon to fill the cups of flour instead of scooping, so it was a little denser than the photos, but we ate it with soup and it was so good dipped and I live a chewy loaf, but next time I’ll try the recommended way next time. I’m gonna have to make this every day now because my family destroyed it all in about 10 minutes!
I have done this recipe more than 5 times in the last 8 mo the. It’s super easy to follow and not hard at all, especially for beginners.
My dough is also quite sticky; I tried adding more flour to the mix but then it gets too dense. Honestly, I made my peace with it, I just cut it in half and loosely place it on the parchment paper. It always ends up to a perfect shape on its own!
I tried adding garlic, Parmesan cheese & oregano to the mix, and it ended up amazing!
Don’t worry if the mix is sticky, simply place it on the paper and put it in the oven. Best recipe ever!
Thanks so much for sharing! Your add ins sound so good, we’re going to have to try that combo! 🙂
Best advice. I stressed over consistency of dough/forming/turning into dutch oven, etc. Now I plop onto dusted parchment paper. I never have to even touch the dough!
Nooo way!! I wet my hands so it doesn’t stick and REALLY struggled working with it!! Will try your method next time! Thanks for sharing it!!!
I wish I’d have read this. I thought we were nuts – I kept adding flour, and flour… lol Then I just gave up and threw the whole thing away. It seemed an impossible mess that would never turn into bread.
We’re so sorry that happened! You’ll have to try it again and let us know how it goes! It’s definitely a wet dough. You never think it’ll turn into bread, but magic happens in the oven and it turns out perfectly every time! 🙂
Oh good! I’m making this currently (waiting for it to rise!) and I was worried because it seemed wet. I’m glad that’s normal!
That’s what I’ve just been doing! Haven’t chucked it so will give it a go, but yeah, still more like a yhick batter than a fough after a LOT more flour
That’s what I’ve just been doing! Haven’t chucked it so will give it a go, but yeah, still more like a yhick batter than a fough after a LOT more flour
I get the exterior look and the taste I want but can’t get the air holes/tunnels. Any suggestions?
Same here, I have it proofing right now but I thought I was crazy it was SO sticky still after adding a bunch of extra flour. I could never get it to “not stick to my finger”. Thanks for sharing
I mean….even “bad” bread is delicious bread! 😂
I made it for the first time yesterday. Dough was super sticky, so I kept adding more and more flour. Turned out “heavier” than I would have liked, but it was still delicious. Am going to try your suggestion tomorrow. Thank you!!
Can I make one big loaf and bake in a cloche?
I made this recipe yesterday and like you it was incredibly sticky. I kept having to add flour just to get it to the point you could touch the dough at all. So after I was done I weighed 3 cups of water and it was 654g. In baking percentages that is 87% and WAY TOO MUCH WATER. I usually shoot for 65-70% which is over 100g less water than the recipe calls for. Next time I’m back to weighing everything.
Hi Zed. Yes, its a very high hydration dough! 3 cups water is 720 gms. BTW. To ease dough handling you can try ‘folding’ the dough during it’s first rises. By that I mean using your scraper to fold each of the four sides of dough ball, in the bowl, in on itself. If you go for a 3 hr. rise, you can do it 4 times at the end of 4×45 min. intervals. The dough will gain a lot of structure from this. You can also dump the dough on the counter and use a “slap and fold” technique. At the end you’ll find it much easier to handle/shape. Good luck.
I should have took your recommendation. Wow! It’s the consistency of pancake batter.
made it today did one extra cup of flour dough rose great then gave light kneading and a second short rest in an oiled bowl currently baking but got nice air in the dough to get good crumb
Im trying to make this bread right now and am having trouble proofing my yeast. Should I really be using 3 cups of water to proof the. yeast? Or only use around 1/4 of water to proof the yeast and then add the rest of the water into the full batter?
Great recipe. Very easy. 1st bake just came out of the oven. Letting it cool & waiting to taste. I think this going to be my go to recipe from here on.
Sifted & weighed 1/2 bread flour & 1/2 regular flour. Baked the boules directly on the baking stone w/ a bit of corn meal under them. Beautiful.
Wow! I never thought I could make bakery quality rustic loaves from my oven. Crusty outside and chewy on the inside. I halved the recipe, but otherwise followed it.
Can you use whole wheat flour?
We haven’t tried, but you can usually substitute half of the plain flour with whole wheat flour without making any other changes. It may make the bread a little more dense, but it should still be delicious. If you try it out, let us know how it goes! 🙂
Mine didn’t have as many holes as yours, but honestly, I couldn’t care less. I’ve never left a comment on a recipe before, but I just have to say this was the best bread I’ve ever baked.
That’s so good to hear, so glad you loved it! 🙂
I made this recipe today. I live in Minnesota. Like many of the comments said, my dough was also very sticky. I just accepted it and followed the recipe. I did end up with two round rustic breads. I just cut into one, after waiting an hour after baking like it said, and it’s good! I did check the temp of the bread before shutting off the oven and it did read 190 degrees Fahrenheit. It did take 30 minutes to bake, exactly like the recipe said. I did not need to tent the top of them at all. I did weigh the flour with my food scale. I used bread flour. I topped one of the loaves with a sprinkle of rosemary and coarse sea salt before baking and it was nice.
I have made this a few times and we love it. I haver added herbs from my garden, or caraway seed, or cheese.
That sounds so delicious! Thanks for sharing with us! 🙂
does this recipe call for bread flour or all purpose flour?
I JUST made some with wheat flour! I put honey in mine to make it honey wheat and it was delicious!!!
Oh wow, that sounds amazing! Do you remember what amounts you used of each?
I have it sitting and just realized that I won’t have time to bake it. Can I put it in the fridge (still in the bowl) overnight and bake it tomorrow?
That should be fine! Let us know how it turns out! 🙂
I tried the overnight and it turned out as good as the original time. Thank you!
Hi! If I’m using a Dutch Oven do I cover it or leave it uncovered??
Yes, leave uncovered 🙂 It will help with getting that yummy browned crust.
I’ve converted quite a few white flour recipes to whole wheat – you need to add a bit more liquid as wheat flour really sucks it up. I also add extra gluten (I use Bob’s Red Mill Vital Wheat Gluten Flour) – you only need about a tablespoon per batch to help lighten the heaviness of wheat breads. Make sure you add enough extra liquid – a sticky bread makes a light (not dense) loaf!
I haven’t tried it yet on this one, but I’d give it a whirl.
I tried making this and it would NOT cook through. I think in total it was in an hour. Still both loaves were gummy inside. The crust was super crispy and delicious but I could not get it to cook inside. Not sure what I did wrong. Ugh.
Oh no! I’ve made this a lot and never had this problem! I think usually you can cook the bread for longer to see if the inside will finish. If your crust is getting too brown, you can tent foil over it so the outside won’t keep cooking. It possibly could’ve been a problem with too much flour. How did you measure it out? If you spoon flour into your measuring cup versus just scooping it out with the cup, it can cause you to use more flour than the recipe calls for.
Can you just bake this in a dutch oven and not have to worry about placing a pan with water in it in the oven?
We haven’t tried it that way, but let us know how it turns out if you do! 🙂
I just had the same issue with mine. Idk what I did wrong either bc it’s my second time making it and it didn’t work.
How have you been measuring your flour? Are you weighing it or using a measuring cup? Weighing it is the best way to make sure you’re accurate in how much flour you’re using!
Hi. Just want to share an idea I saw on Bigger Bolder Baking.. instead of saran wrap, she used a shower cap to cover the bowl, then a kitchen towel. It’s to reduce plastic waste and essentially save money since the shower cap can be reused multiple times.
That’s a great idea!
Is the bread supposed to have holes in it? Mine tasted great but no holes like in your photo.
It is. There may be a few reasons that yours isn’t getting them. When I don’t have enough time to let it rise, my bread is more dense with less holes because there isn’t enough time for it to get all of those air holes. This is also a no-knead bread, so there should be minimal messing with the bread between taking it out of the bowl and adding it to the pan. There could also be an issue using too much flour, which could be making it more dense. Hope that helps! 🙂
Hiii ! Can I use instant instead of active yeast?
Yes! When you use instant, you don’t have to worry about letting it sit. Just make sure you use whatever temperature of water your yeast calls for!
Do you slide the bread from the floured pan to the preheated pan in the oven?
No, you can just do it on your stove or counter. Just be sure to put hot pads under the preheated pan if your counter can’t handle the heat! And don’t take the pan out to put the bread on until you’re ready to make the transfer. Enjoy! Let us know how you like it 🙂
Hi! I would like to know if I can bake this bread in a covered 5 qt Dutch oven pot in the oven? Thank you
I don’t see why you couldn’t, but we’ve never made it that way before so we can’t say how it will turn out. But if you give it a try, let us know! 🙂
AMAZING!
Just wondering if you can leave it to rise overnight? Fresh bread in the morning is the best!!! Ha
I’m not sure why you couldn’t? If you try it out, let us know how it goes! 🙂
Can someone please help find the recipe
with the French bread sandwiches that Jordan had on her stories the other night?! I’ve legit been looking for an hour and a half and can’t find it lol
It’s actually on the Fun Cheap or Free site, which is why you couldn’t find it! Here it is for you 🙂
The bread I made from this recipe tastes great, but I could not get a round loaf like the one in the picture. My loaf is like a 3-4 in flatter oval. Any tips? I did it a second time and even added about 1/2 cup more flour, but it was no different. I’m baking on a baking steel. It seems much too wet to form into any sort of shape.
How long are you letting it rise for? It doesn’t sound like it’s getting enough time to get those air bubbles that will make it round and taller. Also, are you at a higher altitude? I haven’t had this issue, so I’m not 100% sure what to tell you!
This recipe worked really well! I halved it as I only wanted to make one loaf and it was delicious. I used instant yeast so just didn’t do the 5 minute wait at the start.
So glad you loved it! Thanks for sharing that halving it works well. 🙂
When you used instant yeast did you have to use really hot water or did the warm water work? Also did you still let the dough rise before baking?
Anyone else having a problem getting the bread off of the cookie sheet? I’m not sure if its not done yet but its stuck to the bottom. Other than that this recipe is amazing!!
Have you tried putting parchment paper on the cookie sheet? Bet that would help! So glad you love the recipe! 🙂
I let it double in size in the bowl. The dough almost poured out of the bowl. It had lots of bubbles but too soft to work with. I had to sprinkle flour on it a couple times but couldn’t shape it. Baked for 30 mins but its dense. 😢
Oh no! We’ve added a video to the post, so maybe that’ll help clear up any questions? Let us know! 🙂
I’m having this same issue
Yes, it formed a really thick bottom crust that I couldn’t cut through.
Making my second batch in 2 days! Great recipe, and one to remember for quick (and tasty) bread – I made a lovely bruschetta with mine which had compliments all round – I fried leftover dough (dollops in shallow oil, approx. 1 min on each side) was also delicious – can’t recommend this recipe enough! Can’t wait to experiment with this recipe in the future.
This is so great to hear! Thanks for sharing your favorite ways to make it 🙂
Has anyone made this recipe using gluten free flour?
I’m going to try using gluten free flour as well. Let us know how you make out of you do and I will check back in.
I just made this with gluten free.. I was super nervous because gluten free flours can be tricky! 🙂 but it’s awesome! I did have to cook for additional 12 mins. And the dough was super sticky when trying to get it into 2 loaves onto a pan to bake.. but entire family is loving it! So easy.
I did and had good results with King Arthur gf flour but I just used bob’s red mill and it came out way too crispy on the outside and doughy inside. 😢
So fast and easy to put together and it is delicious! My family loves it and it makes the meal feel more special to have homemade bread along side.
Love rustic no knead recipe
Hi! First time making bread, so I was nervous. The taste was on point, but the bread was dense. When it was done rising (3 hours), it was filled with bubbles. I knew this was a good sign. But it was so sooo wet and sticky and I had to add a lot of flour. I could barely make a shape. The crust was so perfectly crunchy, but I don’t know what to change next time. Any tips? Thanks!
How did you measure out your flour? By the cup or in grams? It sounds like maybe you didn’t have enough flour to begin with, then added too much to try to make it into a ball, maybe? When making bread, it’s really best to use a kitchen scale and measure out your flour in grams so you get exactly how much you need! When you do it in cups, you can use too little or too much depending on if you loosely pack it or tightly pack it. If you don’t have a kitchen scale, it’s best to use a spoon to add your flour to a measuring cup, then level it off with a knife WITHOUT packing it! If you have a dutch oven, you probably could’ve also used that to help hold the shape. We’ve never done that but we’ve heard of others having good success with that method! 🙂
This is my second time trying to make it. It tastes good but when I split the dough and put in on the pan it’s kind of flat. I let it rise for 5 hours and followed the instructions so I’m not sure what I’m doing wrong. Help?!
There are a few things that could be going wrong. How long did you let it rise the first time you made it? You may be letting it rise for too long, so maybe try shooting for the 1-3 hours mark when you let it rise. Also try really hard to not knead it or overwork it after that first rise when you split it! Another issue could be that your ingredients are maybe too old, so they’re not working to their full potential. Check the date on your flour to see if that could be the case. Lastly, how are you measuring out your flour? It’s best to weigh the flour with a food scale so you get the exact amount that’s needed. One person’s cup of flour could be different from another person’s, depending on how it’s scooped. If you don’t have a scale, no worries! Fluff your flour with a spoon, then use the spoon to add flour to the measuring cup. Once full, use the back of a knife to level it off. Hope these help! 🙂
Hi, just made this for the first time and it turned out pretty good, but I am wondering if I could turn the dough out onto floured parchment paper so that I could easily slide it onto the pizza stone or cookie sheet? I found that when I had to lift up the dough to put it on the pizza stone it deflated a bit and was trying to think of a way where I could get it on without handling it anymore.
We haven’t tried that out, but I don’t see why you couldn’t! Let us know if it works for you if you try it out!
Will rapid-rise yeast work with this recipe?
Yes! Just skip the step where you let it sit at the beginning.
I have made this recipe 3 times and it tastes great. My concern is the same as several others- the dough is so runny that I cannot form it into any shape. I use new yeast, new flour that I weigh out at 750 g, thermometer for yeast water, and I let it rise for 3 hours. This time I cut back on the water to 2 3/4 cups. Still very oozy. Suggestions? Thank you!
Goodness, are you at a higher altitude, maybe? I’m not sure why it’s doing that because we’ve never had any issues. If you have a dutch oven, you could attempt baking it in that. We haven’t tried it but have heard of others having success with that!
I have the same issue – i had to add 3 extra cups of flour and it was still a sticky crazy terrible mess – i’m baking to see what happens but theres no chance at all those ratios work i’m so confused as to how any one has success – and I was so excited! hopefully it bakes into something edible. Did you use bread flour? or all purpose? and what temp water i did the normal temp for yeast water and i got a fantastic rise over the 3 hours but it was a gloopy mess
hey there, can I make 4 small loaves instead of 2 large ones? Making these as part of a gift. I have used the recipe before and it’s amazing, I just don’t want to mess it up if I make it smaller.
You could, you would just have to cook them for a shorter amount of time. Unfortunately, we haven’t tried making them smaller, so we haven’t tried this to know for sure what amount of time. Maybe try to bake it for half the time and go from there? Let us know how it goes! 🙂
Love this recipe! Anyone tried making one big one?
I did one large loaf tonight and it worked just fine! Instead of an X on top I just cut three diagonal lines. I had to bake it for a bit longer, because of the size, I think, but my kids declared it the best batch to date.
Oh nice, that’s so great to hear! So glad you loved it!
I have tried to make this twice today and I bake quite a bit. I measured my flour with a scale and followed the recipe to a tee. 3C water at 110 degrees. One package of active dry yeast. 1 T sugar. 3 tsp salt. 750g flour. I let proof for 2-3 hours and the dough was easily doubled or more. The dough is so wet it’s hard to shape. I tried adding more flour the second time but for the same results. I’m not sure what I’m doing wrong. I’m concerned about adding too much flour but the second time added almost another cup. Difficult to do the fold and impossible to shape much less slash on the top. Got the same result. What is wrong?
This is so weird! Are you at a higher altitude? We haven’t had this issue before.
I shaped into two loaves instead of boules so that I didn’t need to handle the dough as much. I also added 1/2 good Parmesan cheese, tablespoon of rosemary and 1/2 tsp of garlic powder to boost the flavor. It turned out perfect.
Oh yum! So glad to hear you loved it!
Does this bread not require a second rise? After shaping into 2 loaves?
There’s no need for a second rise!
I tried this after reading the nice reviews but honestly had the same problems others had. I measured everything I could out by weight but the dough was just too runny. You cant shape it in any reasonable way, and handling it is too messy. I’d be okay with all that but it also take forever to finish. I had mine in the oven for over 50 minutes and it’s still not done! Oh, and no, I don’t live in a high altitude area, so that’s not the problem. Overall, kinda disappointed, since I just wanted a rustic loaf without having to get a dutch oven. Looks like that’s a bit too hard to do though.
So sorry to hear this! We’ve added a video to the post, so maybe that’ll help clear up any questions?
Before I try this I have to question the flour to water ratio. Three cups of water is about 708 grams. With the flour at 750 grams you get a hydration of about 94%. That’s a really wet dough, more than ciabatta. Am I missing something here?
Thanks, Marty
It is a wet dough, but it works! 🙂
SO yummy! Will make again and again!
Yay, so glad to hear you loved it! 🙂
This was really easy to make and turned out so well, tried other recipes which was either too much work or doesn’t turn out well, thank you!
So glad to hear you loved it! 🙂
I am a terrible baker, but, I was determined to find a bread recipe that I could make and that I liked. I’m in Italy, so I weighed my water and flour. I used ’00’ flour. I let is rise for 3 hours. The last hour, I set it near my hot water radiator. The dough was so wet and sticky. I almost chucked it. But, there was no turning back. I made two loaves and sprinkled lightly with Maldon Sea Salt. My oven is pretty tiny so it was hard to fit the baking dish with water inside, but I managed. The bread turned out absolutely perfect! Oh, and I only made half the recipe. Thank you!
Hello, Italy! We’re SO glad to hear that you loved it and it turned out so well for you! 🙂
Can you tell me in ml exactly how much water to use please
According to Google, it’s 709 mL water 🙂
Thank you for such a quick response
I have had to add so much flour I know the bread will be ruined and even then it was so wet it doesn’t hold it’s shape. I did it exactly to the measurements stated it doubled in size but the dough was more like cake batter!! So disappointed. I can’t understand how so many people are finding it way too wet and so many people are finding it fantastic!! I’m in Cornwall in the uk so nothing to do with altitude I can only think maybe the flours are different. It wasn’t just a bit wet it was almost runny and still runny after adding another cup of flour!!
I did this recipe with half whole wheat flour, and half white. It tastes great! The dough was very sticky, but a bit of flour solved that enough to move it to the pan. It didn’t have any holes on the inside like yours, and it looked a little doughy inside after 25 minutes, but after a few more minutes it was done. I did two loaves, and for the first one, I had a hot pan to put it on, but for the second one, I didn’t put it on a hot baking sheet, and it was still great. Highly recommend, especially for beginners, like myself. 🙂
So so glad to hear that you loved it and you were successful in modifying it to work for you! It probably took longer to cook because of the whole wheat flour, but I’m happy to hear it worked out perfectly for you! 🙂
Total newbie here. Can you please explain what it means to fold the bread out? Also can you explain the reasoning for using a pizza stone if you are still just the bread onto the pan onto the stone?
I just wanted to thank you for this recipe. It is so delicious and so freaking easy to make! My in-laws were in town for a couple weeks this month and I had it made when they arrived, then I made it again… and again for them because they loved it so much. I probably make it once a week now and have the recipe memorized and it always turns out so good! Thanks again!
Oh wow, we just love hearing this! So glad your in-laws loved it! The fact that you have it memorized is so fun 🙂
This is just a godsend for me your site. I work and my husband is constantly on business trips so there is simply no time to cook. I want that it would be quickly cooked and delicious. So your site is just a gift for me. Thanks. Everything is delicious and fast!
So glad you’re enjoying it!
3 cups of water??? Really? According to this that would be 94.8% hydration… that is like… unheard of
3 cups of water is correct! Let us know if you give it a try.
Tastes great but came out a little doughy! I’ll probably give this recipe another go when these loaves are eaten, because it was quite easy.
So glad you gave it a try…maybe add in a bit more flour next time!
Well I made this today and had no problems at all. I used a brand new active yeast and normal all purpose flour. Yes it was sticky but nothing runny…i used a preheated cast iron skillet for one loaf and a stone loaf pan for the other, drizzled olive oil and pink Himalayan salt before baking. OMG so delish! Thank you for the recipe. We are having mussels in wine sauce for dinner and cannot wait to dip! (We couldn’t wait for it to cool to test it out lol was worth the burned finger tips 😋)
YUM! So glad you liked it!
Amazing result for so little effort ! Best bread recipe I have tried lately . Thank you !!
So glad you enjoyed it!
This is my favorite bread recipe!! So easy and forgiving!
So glad you enjoyed it!
This is so comforting and easy!
Trying this today!
Let us know how you like it!
I need to know the ml of water as I’m confused
We recommend using a metric conversion calculator to find out how many ml are in 3 cups of water. Hope that helps!
I notice that many of the comments here on difficulties relate to the amount of water in this recipe. The telling point was that it says to add 1/4 cup flour at a time if it is too sticky. The best way to make a recipe like this is by weights, not measurements. So a typical rustic bread would use 750g flour, 15g (2%) salt, and for a “wet” dough between 525 and 600g of water (70-80%). More water if you work the dough longer and less if you don’t. This recipe doesn’t work the dough much so I’d do 70% personally. Ultimately when I was done adding flour I was around 75% and that was still a little too much water for my liking.
Thank you for sharing this!
I have never written a review for a recipe before but for this one I had to. There are a lot of reviews stating that there were issues with how the bread came out so I was skeptical and only made half the recipe to try out. I have never made bread so perfect, if you follow the instructions and notes it should come out great! I will be using this recipe many more times and I will try adding in different herbs and ingredients. Thank you so much for the easy and delicious recipe!
Thank you for taking the time to share the feedback! We are so glad that it worked out well for you.
This didnt work for me at all 🙁 The batter turned out very runny before I even used the full 3 cups of water! I ended up adding almost 3/4 c of extra flour and not using the full 3c of water. Did you by any chance use only bread flour to make the bread?? I used a mixture of all purpose flour + bread flour (almost half half) and I weighed my flour very accurately on my kitchen scale to make a total of 750g (then had to add in an extra 3/4 c AP flour because I was out of bread flour).
The hydration was wayy too much, it was almost like a thick pancake batter for me before I added the extra flour. The end result was a decent dense bread (so no big holes for me), overall the recipe did not result with a rustic bread like the picture :/ just a square bread kind of consistency. Do you have any advice on how to shape a sticky dough like this without deflating the bubbles? Is it better to shape it and let it rise more? its impossible for me to shape it without deflating since its VERY sticky 🙁 any advice would help!
I’ll be trying this again in the future with only bread flour and 70% water by weight, hopefully it’ll work!
95% water? Is that correct? Most of my bread recipes are about 70% water. I’m curious and will try this recipe, but it seems the dough would be to sticky to handle.
So good and so easy. Make it twice a month following the directions exactly!
Julia thank you for sharing this. That is awesome news!
I forgot to Buy Bread for our garlic bread for our Christmas dinner and in a pinch I made this and it turned out so incredible. Made it again today incredible again!!! Yes the dough is sticky but with a lightly floured surface a few dashes more of flour and floured hands it was very easy to work with.
Thank you for sharing! That’s awesome
I was searching for a crusty bread to go with the chicken totilla soup I was making. Like everyone else the dough was very wet. The next time I will reduce the amount of water slightly. However I did find it easy to mix by using a spatula. After dividing the dough, I used the end of a spatula to tuck the bread under instead of using my hands and that worked well. I did dust with flour and baked this in my cast iron skillets which I had greased and placed a light layer of cornmeal in the bottom to keep them from sticking. The bread turned out so beautiful. The crust was nicely browned and crunchy. The cornmeal on the bottom added flavor and it went perfectly with the soup. I’m keeping this recipe for my got to.
There’s no way that this is correct. A 1:1 ratio?
I had to add almost another 300g of flour for it to become manageable.
What sort of flour were you using??
“Good way of describing, and good article to obtain facts concerning my presentation subject
matter, which i am going to convey in college.
”
erful website.
“
In the recipe it says the amount of flour needed is 650g, this is not correct. A cup of flour weighs about 150g so if you need 6 cups you will need 900g. We started off using 650g and it was like batter; at 900g we could call it dough.
Thank you for your feedback. We appreciate it.
I have never been successful making bread BUT, wow! I have just made this recipe and I’m so chuffed. It is soooo easy to make and it’s the best bread I’ve had in ages. I didn’t add any more flour just put it on the tray in the oven and hey presto! 30 mins later two lovely, crusty loaves. Thank you for sharing!
That is the best news! thank you for sharing this with us.
I thank both of you for your words of encouragement. This blog has been a wonderful place for me to learn, and just watch others comment, and share were they are on there journey. I can not explain what the book of Enoch has done to my life, the questions it has answered, and more that I have. It is so good to see this blog growing, and everyone putting in there two cents.
Just made this (perhaps my first time making bread ever) but using a sourdough starter instead of yeast! Really pleased.
Will try it the other way sometime too.
Hello! I am really wanting to try this recipe but I’m having trouble activating the yeast. I just bought a jar of active dry yeast and it wouldn’t start foaming. So I went and bought two more packets of it and neither packet will foam either. Am I just that unlucky that I bought three things of dead yeast, or am I doing something wrong? I tried it in 103 degree water, 105 and 106. I tried stirring and not stirring and am having no luck!
I’m sorry it didn’t work! You could try a slightly lower water temp, like between 95-100 degrees. Also, if this is your first time working with yeast, it is good to note that “foamy” yeast doesn’t actually have bubbles forming. “Foam” is the term usually used but might not be the best description. We suggest Googling images of activated yeast that is ready to be used and compare it to your results.
This was absolutely amazing, I added some extra flour in mine since I’m a lover of denser bread. Super easy to make and my family loved it. I feel a little weird about asking but could I cook it at a lower heat for longer? My oven overheated at 450 which is why I ask. Worst case scenario I’ll try to bake it again and figure it out.
Made this, following the recipe to the absolute letter, using my kitchen scales to measure everything out.
It worked absolutely perfectly – I’m amazed at the bread I created without having to bust my backside with a tonne of kneading.
This recipe will work just fine – just follow the instructions, as opposed to your own interpretation. Amazing recipe!!!!!
Its a shame i can’t post pictures of my bread, because its lovely!
Thankyou for this wonderful recipe!
I made this recipe for my scrambled eggs for brunch this morning.
I halved the recipe exactly, and found the flour to water ratio was way out – I added just over 100g more flour (to the half quantity, so if you’re making it to the full quantity just over 200g), this was basically enough flour to make it JUST hold together, it was still very sticky (stuck to my fingers big time), but manageable. I did use bread flour, which I understand doesn’t absorb quite as much water as all purpose flour. I left it to rise for about 2.5 hours, then tipped it onto a floured surface and barely shaped it at all, just enough to pick it up with two hands and put it onto some lightly floured baking paper. I used a very sharp/fine craft knife but found it was very difficult to score being so wet. However! The wet dough gives beautiful bubbles and it was definitely the airiest loaf I’ve ever made. I lightly dusted the top with flour and baked it for 27min at 210°C (fan forced, equiv 230°C conventional bake), and it came out incredibly well!!
Tastes amazing just smothered in butter, and I also toasted a couple of slices for my eggs – just a drizzle of olive oil then put it in a hot pan, crisped up nicely, got a beautiful colour, had a nice, chewy crust without being difficult to eat.
Made this bread once already and it turned out great! However I’m not sure which oven setting to use. My oven has the option to choose top and/or bottom heating with/without fan. I was wondering, which setting would be best to make this bread?
When I made it, I used bottom heating only, but after 30 minutes, the crust was hard (which was good I think), but it looked really pale, and the bottom of my loaf wasn’t really hollow when I tapped. So I turned it to top heating for another 10 minutes, and top+bottom heating for another 10 minutes. After the additional 20 minutes, the crust became a nice golden brown, but the bottom still didn’t sound hollow when I tapped. But I just took it out of the oven and prayed for the best and luckily it was cooked through and turned out great! But I would still like to know which setting is best for this recipe, thanks!
I was wondering, can you use Dutch oven if you have one.
Yes, a Dutch oven should work well.
Good recipe all around but it’s a lean bread, baking to only 190° would make for an under baked loaf. 205°-210° F is your goal for this type of bread.
Set yourself up for success and not failure!
Just made it!! SO DELICIOUS!! Perfect recipe!!
I’ve made this bread twice. It’s delicious! However, I’ve also always ended up with a very wet sticky dough that looks nothing like the video. It’s very difficult to hold and form into a smooth ball, as seen on the video. I’ve followed the directions exactly as written. I’ve noticed numerous other reviews mention this exact same thing. I did notice in the article that you mentioned starting with (2) cups of water and adding the third cup slowly until desired consistency. Do you actually use the entire (3) cups of yeasted water? The bread is very tasty, but I would love to be able to form it into a smooth ball as shown in the video. Thank you!
My daughter and I are baking this while we ride out hurricane Ian. The dough is resting now. I am using a dutch oven to cook mine in. After it has risen can i just pour it into the dutch oven or do i still need to handle it a bit?
I absolutely love this recipe! SO DELICIOUS!!! So simple! Inexpensive to make. The whole family LOVES it and requests it often. Makes a great gift!
This is a great bread recipe. It has a wonderful crispy crust and a good chewy crumb center making for a terrific tasty bread. My one advice would be to initially use two cups of water to the flour and yeast mixture. Mix and then add only a small amount of additional water until the dough comes together. It can be a little sticky but it wont be to oozey or too wet to handle. I used about 2 1/4 cups of water. You can use more or less water for your loaves when you see that the dough no longer seems dry and the dough starts to come together. It should still be somewhat sticky
I tested this recipe in preparation for Thanksgiving. It was super easy and delicious. I can’t wait to make it for my family this year.
Wow I love this easy, crusty bread! Beats out my sourdough!!!!
Have been trying to make a white, italian, country style loaf for 3 months now. This is the closest I’ve gotten. It was indeed as wet and sloppy as reported in the other comments–did not form balls, but were wet globs that I tossed onto the pizza stone, with parchment paper beneath the glob. (Did two globs, each on their own piece of parchment.) They are crunchy on the inside, white and bubbly on the inside, but not much more than 2.5 inches tall. I’m looking for a loaf that rises more. But it was pretty good.
I meant crunchy on the outside!!!
Very nice recipe. Had to forcibly stop myself from kneading but I refrained. I made French toast with this bread, letting it sit in the egg cinnamon mixture a bit to soak it up, topped with blueberries and strawberries. It was so much better than store bread french toast. Hearty and filling. The bread itself was flavorful to eat, slightly toasted with butter. The whole family enjoyed and now I’m afraid I can’t go back to processed bread from the store.
This is BY FAR the best and easiest bread recipe I have ever made and used! Definitely a keeper, turns out perfect every time!
I will note, I’ve used the entire 3 cups of water and had to add at least one additional cup of flour in 1/4 cup increments to get it to form a ball. I also let it rise a second time while the pan is heating in the oven and use parchment to place on the hot stone vs another sheet pan.
This is my first time making bread and I’m struggling a bit! Could you please point me to the video you mentioned? Thank you!
Easiest bread recipe I’ve ever made. Two loaves is to much for just one person so I usually give the other to a neighbor. Everyone that I’ve given bread to from this recipe can’t get enough, constantly asking if or when I will be making more. Very affordable to make. And you’ll definitely make some new friends in the process. Lol awesome recipe! Thanks 👍
Absolutely love this recipe 😍🤤 I always add in a little extra this and that to make different flavours!
I do have a question! Can you let it rise overnight?
That’s great to hear! We have not personally tested this recipe with letting it rise overnight, however you should be able to if you put it in the fridge. Let us know how it works!
I’m so confused, Am I meant to knead the dough the begining or just combine the ingredients?
Many recipe blogs are overly long so I usually just ‘jump to recipe’ and get going because I’m a seasoned cook. However, I don’t bake bread often so I was VERY discouraged by the wetness of this dough and how difficult it was to work with. My suggestion is to just add a very simple (*see blog notes*) next to the WATER amount. I would have started with 2 cups and added as suggested, but had not read that part. That may help other readers as well?
I’ve tried several artisan/rustic recipies and aside from a suspected faulty scale and my discovery that yeast likes flour that isn’t fresh out of the freezer; this one is consistently good. And I’ve done it each time as a single boulle in a 6qt cast iron enameled dutch oven. Anybody refrigerated this dough overnight?
I have made all of our bread since 2020 and we enjoy it, but I was looking for the open crumb. This was a total fail. Super dense, inedible bread, straight to the trash. The recipe is misleading as the dough will not become unsticky and as others have stated the dough is like pancake mix. The risen dough did have a nice spider web construct, but never got an oven spring. I followed the recipe precisely, so I would revisit your directions.
What is the purpose of the pizza stone/flipped baking sheet? Each time I’ve followed this recipe and laid the dough on a baking sheet, and then on the second upside down baking sheet, it results in the bottom of the bread not baking through because heat doesn’t travel through the two layers of baking sheet.
This sounds great. Has anyone made this in a dutch oven with success? And would I still have to put a pan ov water in the oven if I used a Dutch oven?
This is by far the best bread recipe I’ve made. I’ve made many. It’s such a gorgeous looking bread when it’s done. My daughter and I had a recipe that we both loved and used often. I’m now switching to this recipe for all my bread. I’m actually going to make some and give as gifts. I bought bread bags with thank you stickers. That’s for sharing your masterpiece with us.
I went into this fairly skeptical about the “no-knead” part. Then when I finally got my dough together and noticed how insanely wet and sticky it was, my skepticism plummeted into outright pessimism. But I decided to trust the process, and I only added a small amount of additional flour (maybe 1/4 cup at most).
My dough doubled in about 1.5 hours, which is when I moved onto the next step. I also got concerned here about the lack of second proving, but I continued to trust the instructions. The dough was still very wet and sticky, but not as bad as before. I divided and roughly shaped them, then put them on a hot baking sheet with a dusting of flour.
After 30 minutes of baking the loaves looked very rustic, as advertised. They rose a lot and overall looked well baked. I let them cool on wire racks for about 12 minutes, then cut into a loaf and my doubts and pessimism immediately melted away. The crust was firm but sliceable, and the interior was fluffy with nice air pockets. Then I tasted it and knew I made the right decision to trust the instructions. The bread is extremely tasty.
To others with doubts; don’t trust your instincts. You’re going to be upset with how wet and sticky the dough is. You’re going to get it all over your hands. You’re going to have difficulty shaping it. Just remember that it’s supposed to be rustic and imperfect looking. Follow the directions and the result will be worth it.
Wow, appreciate such a detailed review!! Thank you for trying, and trusting!
I have made this several times now, experimented by adding seeds and whole-wheat flour as well, always comes out great. But I don’t seem to get those large air pockets like in the picture.
My son makes the rustic bread all the time! It is soooo yummy! I will have to try making it!
This is kind of a perfect recipe! haha 🙂
I was super pleased to see the way the dough came together and although when baked it was a bit more dense than I would have liked- I’m pretty sure I can blame it on the length of time i let the dough sit.
I have high hopes for a better outcome next time!
Thank you for your help!
I tried it and my loaf came out quite good. However I am not comfortable with the lack of measurement with scale. It would be great if you could provide this recipe in grams and ml. I would be most grateful.
just curious. the picture you have in the recipe looks absolutely nothing like the final product in the recipe video. what gives? the picture looks amazing, but the bread in the video is very light, extremely dense, and looks overall just heavy. there are no air pockets whatsoever
Made this bread a couple of times. Its really great when done right, the trick is that you only start the yeast in 2 cups of water and leave the 3rd cup for ‘as needed’ use.
Word of advice to the recipe writer – don’t put 3 cups of water as the measurement in the recipe and then put ‘start with 2 cups of water’ in the notes. Most people will hit ‘jump to recipe’ and never see that note. Probably every single person that complained the dough was too wet to handle most likely bloomed their yeast in 3 cups of water and never saw that it was supposed to be 2 cups and a third cup to be used *if needed* to reach the right consistency and that’s a pretty big step to be putting in the ‘tips’ section and not the actual recipe itself. Same with needing 50min to 1hr to cook it in a dutch oven being in the ‘tips’ section.
Made this as Christmas gifts this year and it was a hit! Made some honey cinnamon butter and fig jam and everyone loved it! Just curious if I could let the dough rise overnight or is 3 hours the max?? I also couldn’t get a good cut x on the dough so I just let it be. They turned out pretty still. They were both very different sizes and shaped but thankfully didn’t give them to people who knew each other so there was no judgment. Love this recipe so much!
Best rustic bread ever!!! I used bread flour instead of AP. The dough was super wet and sticky but after reading others’ comments I just let it be. This was, by far, the best rustic loaf I’ve ever made! Will definitely be a regular rotation in our home. Thank you!
This just came out of the oven, and while I know it’s baked inside, I don’t have high hopes. This was too sticky to easily form, impossible to score, and turned out a very pale tan. I didn’t want to risk over baking just for a darker crust. Fingers crossed for when I slice
Great simple bread recipe! I did have to add quite a bit of extra flour. Wondering if anyone has made the dough ahead and frozen it to bake later.
My first ever bread. Followed the recipe as is but did 50/50 all purpose and whole wheat blended flours. I have a small apartment size oven so pretty much every recipe I have to watch baking times. I just cut the temperature by 25 degrees when it started to brown a little much on top. Used the 2” water pan. Added hemp hearts for kicks. Absolutely delicious bread with my eggs every morning 💓 making my seconds loves today!
Wow I should have headed the warnings from other reviews. I’ve baked bread before and should have trusted my instinct. Way too much water is in the recipe. The bread did not form a ball, didn’t bake well enough. This recipe alone is reason enough to pay for NY Times Cooking.
So good. Follow the recipe. Doesn’t matter that it’s sticky. Just do it. I didn’t add any excess flour except to put it on counter and dust it. Cook it till it’s a desired color. Really. Great. Bread.
I’ve made this recipe so many times that I’ve lost count. It’s simple and delicious, though I never can get quite the air pockets like in the picture. It’s still a winner in my book.
Forever my favorite bread recipe 🙌
I love easy bread recipes! Can’t wait to try it!
One of my go-to, top favs!!
I have made this bread several times now and it gets better each time. I started with 3 cups of water but have since decreased that to the 2 cups and only use about 4 1/4 c of flour . I have always baked mine in a Dutch oven as well, comes out great! Thank you for the recipe. Much quicker than sourdough
I have searched forever for the perfect bread recipe for side dishes. 100% this is it. Followed recipe exactly and it came out perfect the first time. Did one loaf in stone bread pan and the other free form on upside-down cookie sheet with greased parchment paper. As stated, the loaf pan bread made for a softer crust, but still delicious. I am USA bread gluten intolerant. I do fine with homemade or European bread. I used King Arthur Non-Bromate Flour and had no digestive issues. I am going to try using King Arthur Gluten Free One-to-One flour and see how the recipe turns out. Thank you, thank you, thank you!
While my bad was not as light or sorry as yours, it was still very good. I think my problem was during the rise process, the bottom of the container for alittle warm and began to cook the bread alittle bit.
I will try it again but charge when I place it to rise.
This has become a household favorite over here! We absolutely love the flavor and I love how simple it is! The only reason I’m giving 4 stars is due to how much more flour it requires than the recipe states. After making this just about every other week for the last 2.5 months, I’ve found that about 8 cups of AP flour is just right. Other than that, this is some delicious, easy bread. Especially for a “grown up” grilled cheese: fresh tomato (seasoned with salt and pepper, of course), your fav cheese (mozzarella and gruyere is how I do it) and some basil pesto! Can’t get any better than that!
Such a good recipe! I love how easy it is and it makes bread that looks and tastes like you slaved over it.
I have been making this recipe on repeat. It’s so easy and we love it. Having fresh bread every day has never been this easy and delicious.
My loaves turned out amazing. I agree about the water..I had to add more flour but I checked to make sure that the texture of my dough was as described. Wish I could send photos of the loaves. They came out beautiful and tasted great!
First bread I’ve ever made- and it’s now a household necessity. So yummy! First few times I made it, the crust wouldn’t brown. After research looks like it was over-proofed. 3 hours was too long- where I live (Guam- tropical climate and hot all the time) my dough was twice the size within an hour and browned perfectly after that time. Even over-proofed the bread was still delicious, the crust just wasn’t crunchy and brown. Great recipe and would highly recommend!
I find 750g of AP flour and 460g water works perfect , made it 8 times since Christmas… the first time i missed the use 2 cups of water and maybe a little of the third cup…
I also add 5 ounces of diced peperoni to the flour and and salt well to separate the pieces… then add it into the yeast mix